Here is a step-by-step tutorial that will allow you to realise a simple program to use an infrared pir sensor with your console.
This guide is intended for the hardware provided in the [Gamebuino accessory pack]
( Gamebuino accessories kit). Yet you can still follow it with another Arduino compatible pir sensor.
For this tutorial you will need :
- A Gamebuino META console
- An Arduino compatible pir sensor
- A computer with the Arduino IDE installed
If you haven’t done it yet, please refer to the following page to install and configure the Arduino IDE :
Get started (C++ 1/5) : Quick software setup - Gamebuino
Plug it in
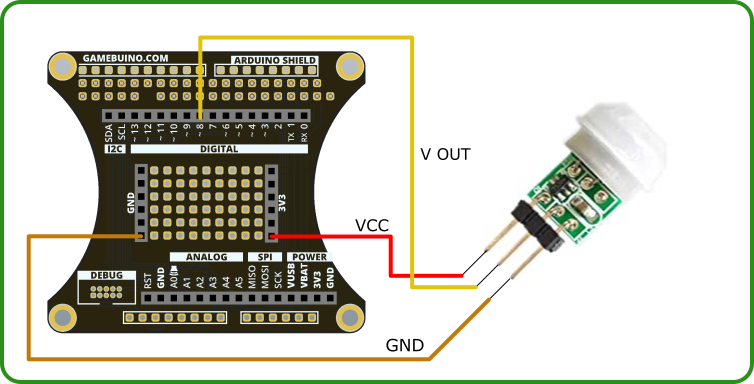
In addition to the code we need to plug the sensor into the console, preferably with the developper backpack
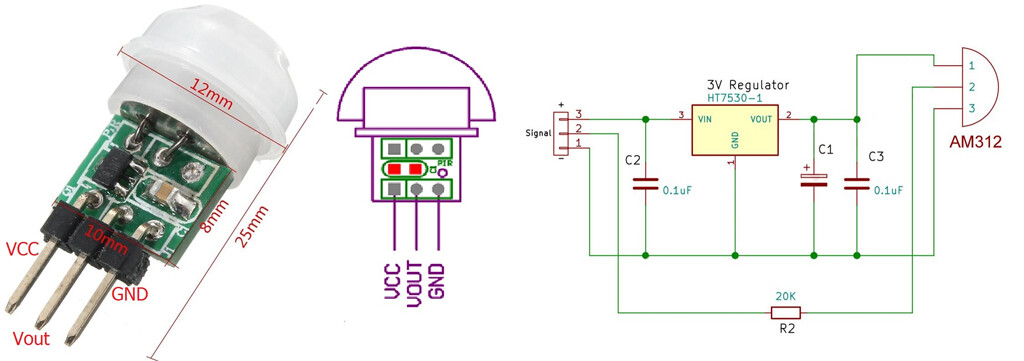
The power pin (VCC) goes to a 3v3 pin, the ground pin (GND) goes to a ground pin. The control pin Vout goes to a digital port, here the D10 port.
Step 1 : easy start
First thing first, open the preconfigured Arduino IDE for Gamebuino
- You should see the following on your screen :
void setup() {
  // put your setup code here, to run once:
}

void loop() {
  // put your main code here, to run repeatedly:
}
This seems a little empty for now, we’re going to fill it up.
*Before anything else we need to add the following line at the start of our file :
#include <Gamebuino-Meta.h>
This is called a “library”, it will allow us to use a whole bunch of functions without the need to manually code them. This specific library contains all the Gamebuino functions and will be very useful for what’s coming next.
We need to add two functions to make our program work :
- In the setup() function we make a call to the gb.begin() function as follows :
void setup() {
  // put your setup code here, to run once:
  gb.begin();
}
The gb.begin() function initializes the console : without it nothing will work !
- Then we add the gb.waitForUpdate function in our main loop() function :
void loop() {
  // put your main code here, to run repeatedly:
  gb.waitForUpdate();
}
The gb.waitForUpdate() function allows for screen content refreshing (drawing things on it), handles sounds, buttons presses, in short everything needed for the console to come to life.
We now have a functionnal program structure, although it does nothing at the moment.
Plug it in
In addition to the code we need to plug the sensor into the console, preferably with the developper backpack
The power pin (VCC) goes to a 3v3 pin, the ground pin (GND) goes to a ground pin. The control pin Vout goes to a digital port, here the D10 port.
Step 2 : using the sensor
- We start by defining the pin used by our sensor and setting it up as an input in our setup() function :
#define inputPin 10

void setup() {
  // put your setup code here, to run once:
  gb.begin();

  pinMode(inputPin, INPUT);
}
The sensor works in a very simple way, at regular intervals it performs a measure and returns either 0 or 1.
- We declare a global int variable called oldState that we initialize as LOW state in our setup() :
#define inputPin 10
int32_t i32_oldState;

void setup() {
  // put your setup code here, to run once:
  gb.begin();

  pinMode(inputPin, INPUT);
  i32_oldState = LOW;
}
This determines a base state we will use as reference to perfom comparisons.
The rest happens entirely in our loop() function.
- We add an int variable newState that we initialize with a reading of the sensor value with the digitalRead() function :
void loop(){
  // put your main code here, to run repeatedly:
  gb.waitForUpdate();

  int32_t i32_newState = digitalRead(inputPin);
Then we will simply compare it to our global oldState variable to determine whether the sensor picks up something or not.
- This comparison is done in two steps :
void loop(){
  // put your main code here, to run repeatedly:
  gb.waitForUpdate();

  int32_t i32_newState = digitalRead(inputPin);

// If we get a HIGH reading and a previous LOW state then we detect something
  if (i32_newState == HIGH){
    if (i32_oldState == LOW){
      gb.display.clear();
      gb.display.printf(" Motion detected !");
      gb.sound.playOK();
      i32_oldState = i32_newState;
    }
  }
// If we get a LOW reading and a previous HIGH state then we don't detect anything or stop detecting
  if (i32_newState == LOW){
    if (i32_oldState == HIGH){
        gb.display.clear();
      gb.display.printf(" No motion detected");
      gb.sound.playCancel();
      i32_oldState = i32_newState;
    }
  }
}
The commentaries are quite explicit here. We compare the NEW and OLD states and act accordingly. We use this opportunity to play distinct sounds with the playOK() and playCancel() functions. We also display simple messages indicating the current state with the printf() function. The most important step being to replace the OLD value with the NEW one after each loop to establish continuity.
This tutorial is now finished, it’s relatively simple compared to the other sensors’ tutorials. Now you can modify your program and try your own experiments.