In this tutorial we will see how to use the potentiometers from the Gamebuino accessory pack with CircuitPython.
Before we start : Tools setup
This tutorial is made using the Mu IDE for CircuitPython.
If you haven’t installed those yet please refer the the installation guide for Mu and CicruitPython available on our website.
Wiring
Before coding we need to plug the potentiometers to the console, preferably with the accessory backpack.
Note that the left potentiometer will use the A1 port while the right one will use the A2 port.
| Potentiomètre | Backpack | Couleur | Description |
|---|---|---|---|
| GND | GND | BROWN | Ground |
| VCC | 3V3 | RED | Power input |
| SIG | A1/A2 | YELLOW | Signal output |
Step 1 : The program’s basis
Start by opening Mu and creating a new file.
Copy the following code in this new file :
from gamebuino_meta import begin, waitForUpdate, display, buttons, color
import analogio
import board
import math

while True:
    waitForUpdate()
    display.clear()
This will import the Gamebuino libraries needed for the program, as well as “board” and “analogio” libraries which we will need to work with our potentiometers. We also add a “math” library that will be very important.
The part that begins with “while True” is our main loop, without it nothing would happen.
Step 2 : Read data from the potentiometers
Here we will gather the raw data sent by our two potentiometers to work with it.
Our potentiometers are plugged on analog pins, so we will use the analogio library to read the data they send to their respective pins.
To do this we will assign the right pin to each potentiometer. This is done in the following way :
#assign A1 pin to left potentiometer
left_pin = analogio.AnalogIn(board.A1)
#assign A2 pin to right potentiometer
right_pin = analogio.AnalogIn(board.A2)
For each potentiometer we call the AnalogIn function from analogio and give it the right pin as a paramater with the board library.
From there we can easily get the value sent by each potentiometer.
For that we create a fucntion called read_pot with a pin as parameter such as :
#read from designated analog pin and returns the value
def read_pot(pin):
    return pin.value
This very simple function will simply return the value read from the pin we gave it as a parameter.
We could display the read values right away. But there is a catch, those values are encoded on 16 bits, and thus range between 0 and 65536, which is not the most comprehensible format.
Thus we will declare a new function, a very simple one, to remedy this issue.
This function, calles make_angle looks like this :
#report raw value from 16bits to 360°
def make_angle(value):
    return value * 360 // 65536
With a simple cross product we change our value from a 16bit base to a range of 0 to 360, which corresponds to degrees, that’s much simpler to use for representing the movement of a rotating potentiometer.
Step 3 : Displaying values and creating an interface
Everything we did so far is pointless, because the functions are not called in our main loop and the values are not used by anything.
So we will remedy those issues right away.
We can start working in our main loop that should look like this :
while True:
    waitForUpdate()
    display.clear()
We’ll begin by displaying the values coming from our potentiometers with our functions read_pot and make_angle.
To do that we will use the base function display.print in the following way :
while True:
    waitForUpdate()
    display.clear()

    #display the value of the left potentiometer after transforming it to angle
    display.print(make_angle(read_pot(left_pin)))
    display.print(' degree\n')
    #display the value of the right potentiometer after transforming it to angle
    display.print(make_angle(read_pot(right_pin)))
    display.print(' degree')
This will read the raw data with read_pot, transform it into angles with make_angle then display them on the screen with display.print. We also add a tiny bit of text to specify " degree" after each value.
Note the presence of a whitespace before “degree” and the “\n”, which is a carriage return used to separate our two values.
So, this is a start but not yet what we’d call an interface
So we will now give a more “graphic” representation to our two potentiometers.
We’ll create a dedicated function simply called draw_interface :
def draw_interface():
No parameters needed here.
We add a call to this specific function into our main loop such as :
while True:
    waitForUpdate()
    display.clear()

    #display the value of the left potentiometer after transforming it to angle
    display.print(make_angle(read_pot(left_pin)))
    display.print(' degree\n')
    #display the value of the right potentiometer after transforming it to angle
    display.print(make_angle(read_pot(right_pin)))
    display.print(' degree')

    draw_interface()
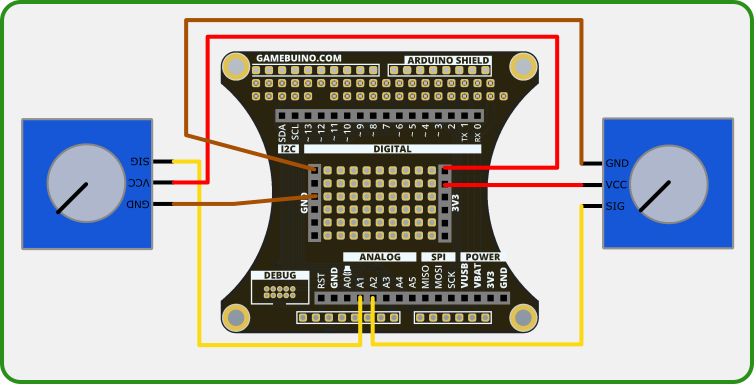
Before filling up our function we should determine clearly what we intend to do. Here we want to reprensent our two potentiometers in the form of two circular dials with dynamic hands that move according to the movement of the potentiometers. The result should look like this :
Above our draw_interface function we will declare a few variables that we’ll use as references to draw our dials :
#variable declarations for circle drawing
#radius
CIRCLE_R = 15
#left circle centre horizontal position
L_CIRCLE_X = (display.width()//4)
#rigght circle centre horizontal position
R_CIRCLE_X = (display.width()//4*3)
#both circle center vertical position
CIRCLE_Y = (display.height()//2)
We define a radius of 15 units, followed by the horizontal positions of our two dials’ centers and then the vertical position, which is the same for both dials.
For that we use references to our screen size (display.height and display/width). this way our display is dynamic, that means changing the screen size or resolution won’t change our dials’ relative positions.
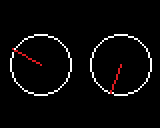
We can then draw the dials in our draw_interface function :
def draw_interface():
    display.drawCircle(L_CIRCLE_X, CIRCLE_Y, CIRCLE_R)
    display.drawCircle(R_CIRCLE_X, CIRCLE_Y, CIRCLE_R)
This will display two circles such as :
The drawCircle function takes the variables established earlier to draw our circles at the coordinates we specified with a radius of 15.
Then we will draw our dials’ hands. This is slightly more complex because it will require a small mathematic operation.
To begin with that we will have to define two variables corresponding to the angular values of our two potentiometers. We declare those right after our draw_interface function :
    #determining the two angular values of our potentiometers
    left_angle = make_angle(read_pot(left_pin))
    rigt_angle = make_angle(read_pot(right_pin))
Using the functions make_angle and read_pot as in step 1 we get the two values we need in the form of variables.
We can now use those two new variables to determine the position on each circle of the hands’ extremities.
For this we apply a formula using the sin and cos function every math person knows (and that normal individuals don’t even understand).
The formula is applied like this :
    #determining the X and Y coordinates on the circle for the LEFT hand
    L_point_x = L_CIRCLE_X + CIRCLE_R * math.cos(left_angle * math.pi // 180)
    L_point_y = CIRCLE_Y + CIRCLE_R * math.sin(left_angle * math.pi // 180)

    #determining the X and Y coordinates on the circle for the RIGHT hand
    R_point_x = R_CIRCLE_X + CIRCLE_R * math.cos(rigt_angle * math.pi // 180)
    R_point_y = CIRCLE_Y + CIRCLE_R * math.sin(rigt_angle * math.pi // 180)
Thus we get two sets of X and Y coordinates corresponding to our two potentiometers.
And now we can display our hands with the drawLine function. Note that this function DOES NOT take decimal values (known as floats in programming), we need to “cast” (transform) the parameters we give to this function into integers (int).
It should look like this :
    #switch display colo to RED
    display.setColor(color.RED)
    #draw hands with int cast for each coordinate points
    #drawLine doesn't support float entries
    display.drawLine(int(L_CIRCLE_X), int(CIRCLE_Y), int(L_point_x), int(L_point_y))
    display.drawLine(int(R_CIRCLE_X), int(CIRCLE_Y), int(R_point_x), int(R_point_y))
We use the setColor function before our line drawing to have them displayed in red, it looks nicer and easier to read.
This way we trace a line between the center of each circle, or dial, and a point of its circumference corresponding to the current value of the potentiometer.
Once the program is uploaded to the console we get the following result :
Congrats ! You survived another one of my tutorials, and a Python one at that. Now it’s your time to play with the program.