In this tutorial we will see how to make a short program allowing us to make measures with the ultrasonic HCSR04 sensor included in the Gamebuin accessory pack with CircuitPython.
Getting started : Tools requirement
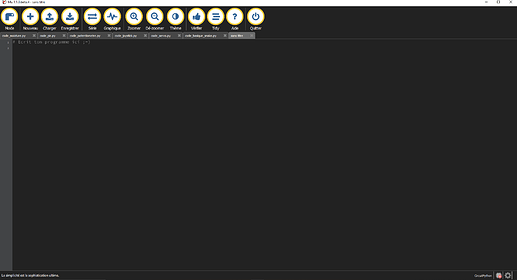
This tutorial is made with Mu IDE for CircuitPython.
If you haven’t installed those yet please refer to the installation guide on our website.
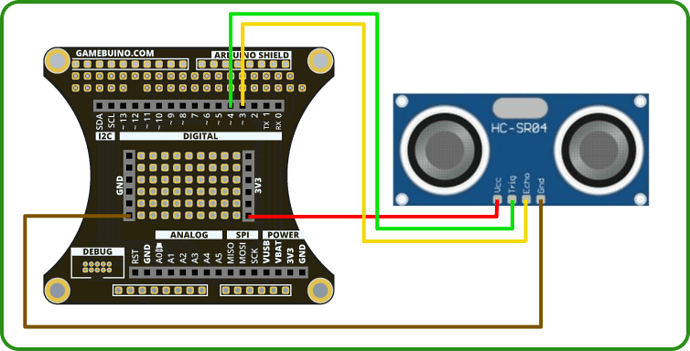
Wiring :
| HCSR04 | Backpack | Color | Description |
|---|---|---|---|
| GND | GND | BROWN | Ground |
| VCC | VBAT | RED | Power input |
| TRIG | D4 | GREEN | Ultrasound emitter |
| ECHO | D3 | YELLOW | Ultrasound receptor |
Etape 1 : The program’s basis
Start by opening Mu editor and creating a new file.
Copy the following bit of code :
from gamebuino_meta import begin, waitForUpdate, display
import time
import board
from digitalio import DigitalInOut, Direction

_USE_PULSEIO = False
try:
    from pulseio import PulseIn

    _USE_PULSEIO = True
except ImportError:
    pass

while True:
    waitForUpdate()
    display.clear()
This will import the Gamebuino libraries needed to make our program work. We add the libraries “time” and “board” that will allow us to use time-related functions and to read data from the console’s external ports (where we plug our sensor). We also add specific functions from the “digitalio” and “pulseio” libraries we will need to manipulate our sensor.
The part beginning by “While True:” is our main loop, without it our program wouldn’t do anything. We will complete it a bit later.
Step 2 : Setting up the sensor
In order to use our sensor we will need to handle the two parts it is made of, those parts being the emitting TRIG part and the receiving ECHO part. Both are plugged into digital pins, D4 for the TRIG part and D3 for the ECHO part. Here we will specify to our program that those two pins will be used.
It’s done in the following way :
trig_pin = DigitalInOut(board.D4)
trig_pin.direction = Direction.OUTPUT
We specify that our digital pin D4 is now called “trig_pin” and we define it as an OUTPUT pin.
We then handle our ECHO pin :
if _USE_PULSEIO:
    echo_pin = PulseIn(board.D3)
    echo_pin.pause()
    echo_pin.clear()
else:
    echo_pin = DigitalInOut(board.D3)
    echo_pin.direction = Direction.INPUT
Here we specify that our D3 pin will be called “echo_pin” and define it as an INPUT pin. Note that we use a conditionnal expression to define the pin status as we used another conditionnal to import our PulseIn function above.
We then declare a couple of variables called “timeout” and “error_count” such as :
timeout = 0.1
error_count = 0
We will use them to check if our sensor works properly.
Step 3 : Reading and displaying data
Now we will declare a function to perform a measure using our sensor. Then we will briefly see how to display the result and handle error cases.
Thus we declare the function “US_measure()” such as :
def US_measure(trig, echo, timing):
Note that this functions takes 3 parameters : Our two pins trig and echo as well as a third parameter called timing. It is not absolutely necessary to do it this way, we do so to make our code clearer and save a bit of time.
Keep in mind we are making a very simple program, in a more complex one it would become increasingly important to keep your code organized and “neat” to make it easier to use and work on.
Now we can fill up our function. First we will initialize our measure at zero to avoid reading unwanted leftover data from the memory. Then we will activate our emitter to send a wave of ultrasounds :
    echo.clear()

    trig.value = True
    time.sleep(0.00001)
    trig.value = False
“echo.clear()” clears up the memory so our measure does start at zero.
We then define our trig pin value to “True”, wait for 1/10000th of a second and redefine its value as “False”. Basically we sent power to our emitter for 1/10000th of a second so it could work and send ultrasounds, it may seem short but it is plenty enough.
We will then add a couple of variables to help us for what’s coming :
def US_measure(trig, echo, timing):
    echo.clear()

    trig.value = True
    time.sleep(0.00001)
    trig.value = False

    pulselen = None
    timestamp = time.monotonic()
The value of pulselen is initialized at None, equivalent to null, this variable will be used to return the measured value at the end of our function. The timestamp variable will be used as a reference point in time. The time.monotonic() function gives it an arbitrary time value, subsequent calls to this function will return different values that can only be higher. Comparing those vallues will allow us to determine whether time has passed or not. Check the function documentation online if you want to know a bit more.
We can now add the second part of our function that will perform a measurement and return the obtained result :
    if _USE_PULSEIO:
        echo.resume()
        while not echo:
            # Wait for a pulse
            if (time.monotonic() - timestamp) > timing:
                echo.pause()
                return (0)
        echo.pause()
        pulselen = echo[0]
    if pulselen >= 65535:
        return (0)
    # positive pulse time, in seconds, times 340 meters/sec, then
    # divided by 2 gives meters. Multiply by 100 for cm
    # 1/1000000 s/us * 340 m/s * 100 cm/m * 2 = 0.017
    else:
        return pulselen * 0.017
We start by activating our ultrasound receptor, the ECHO pin, with the function “echo.resume()”.
Then we wait to pickup a signal. For this we compare our timestamp variable with another call to the “time.monotonic()” function, if the result is inferior to our “timing” variable (worth 0.1 second) we stop the sensor with the “echo.pause()” function and return 0 since the measure didn’t occur.
If we did pick up a signal we then pause the sensor and store the obtained value in our pulselen variable. This value will be equal to the time elapsed between the signal emission by our TRIG emitter and its reception by our ECHO receiver, it is also called “flight time”.
If the value stored in pulselen is superior or equal to 65535 then an error occured and the distance measured is either too great or the sensor malfunctionned, in both cases we return 0.
Finally if everything went well and our flight time is within reasonable range we multiply it by 0.017 and return the value we get. This will give us a distance in centimeters.
Now we can finish our program by completing our main loop. We make a call to our “US_measure” function, store the result in a variable and proceed to display the result on screen.
Nothing too complicated here, our loop should look like this at the moment :
while True:
    waitForUpdate()
    display.clear()
Let’s start by calling our measurement function :
while True:
    waitForUpdate()
    display.clear()

    M_distance = US_measure(trig_pin, echo_pin, timeout)
We create a variable called “M_distance” that calls the function and stores the result.
Now we can either display the result or, in case of errors, display an appropriate message :
while True:
    waitForUpdate()
    display.clear()

    M_distance = US_measure(trig_pin, echo_pin, timeout)
    if M_distance:
        display.print("Distance = ")
        display.print(str(M_distance))
        display.print(" cm")
    else:
        error_count += 1
        if error_count > 9:
            display.print("Measurement Error")
            error_count = 0
    time.sleep(0.1)
We check if our variable does contain a non null value with “if M_distance”. If it does then we simply display a bit of text along with the variable’s content using the “display.print()” function.
If our variable is null, meaning it is equal to 0, then our function didn’t pick up any significant measurement. In this case we increment our “error_count” variable by 1, if this value gets higher than 9 then our measuring function has been called 10 consecutive times in our main loop without any success. So we display the “Measurement Error” message using the “display.print()” function.
Finally we use the “time.sleep(0.1)” function to pause our loop for 0.1 second between each occurence.
You now have a neat little program to test your HCSR04 ultrasonic sensor with your Gamebuino Meta.
This tutorial is based on a library created by Adafruit that is sadly not available on Gamebuino hardware. Some code elements have been taken from the original documentation of this library to replicate its function.

