This is a step-by-step tutorial that will allow you to code a simple program in order to pilot a servomotor with the console.
The guide is designed for the hardware included in the Gamebuino accessory pack. Yet you can still follow it if you have another Arduino compatible servomotor.
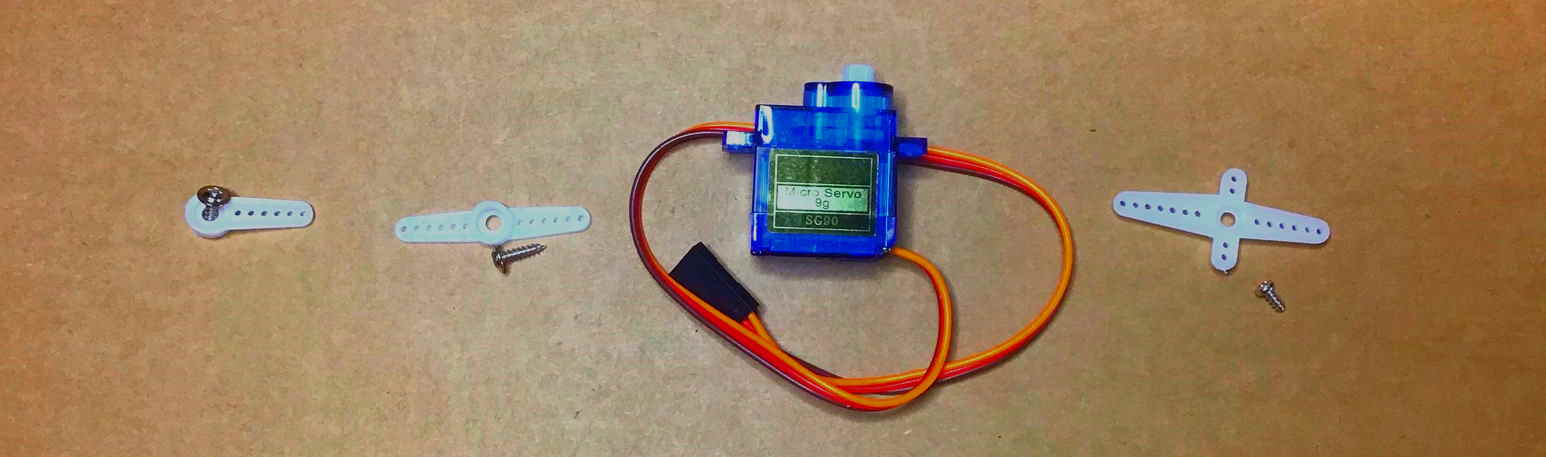
We will need :
- A Gamebuino META console
- 1 Arduino compatible servomotor (5V or 3V3)
- A computer with the Arduino IDE installed and configured
If you haven’t done it yet, please refer to the following guide to install and configure the Arduino IDE.
Get started (C++ 1/5) : Quick software setup - Gamebuino
If you already have some knowledge in coding (or just don’t feel like going through this very nice tutorial) you can simply get the commented code from the Mini-code : servomotor (although comments are in french for now)
Step 1 : Easy start
First thing first, open the preconfigured Arduino IDE for Gamebuino
- You should see the following on your screen :
void setup() {
  // put your setup code here, to run once:
}

void loop() {
  // put your main code here, to run repeatedly:
}
This seems a little empty for now, we’re going to fill it up.
*Before anything else we need to add the following line at the start of our file :
#include <Gamebuino-Meta.h>
This is called a “library”, it will allow us to use a whole bunch of functions without the need to manually code them. This specific library contains all the Gamebuino functions and will be very useful for what’s coming next.
We need to add two functions to make our program work :
- In the setup() function we make a call to the gb.begin() function as follows :
void setup() {
  // put your setup code here, to run once:
  gb.begin();
}
The gb.begin() function initializes the console : without it nothing will work !
- Then we add the gb.waitForUpdate function in our main loop() function :
void loop() {
  // put your main code here, to run repeatedly:
  gb.waitForUpdate();
}
The gb.waitForUpdate() function allows for screen content refreshing (drawing things on it), handles sounds, buttons presses, in short everything needed for the console to come to life.
We now have a functionnal program structure, although it does nothing at the moment.
Plugging things in
Before laying down some code we need to plug in the servomotor, preferably with the developper backpack.
Power input (VCC, RED wire) goes into the VBAT port, ground pin (GND, BROWN wire) goes to, well, a ground port, and the command pin (ORANGE wire) goes to a digital port, here the D10 port.
Step 2 : Piloting the servomotor
Before we can wiggle our servomotor around we have a few simple things to setup.
- We start by adding the <Servo.h> library to our program and declaring a Servo variable to name our servomotor and reference it in our code :
#include <Gamebuino-Meta.h>
#include <Servo.h> // Arduino library for servomotor control

Servo motor;      // declaration of a new servo called "motor"
This will give us access to servomotor related functions without the need to code them ourselves.
Then we have to define which pin is used to command our motor and give it a default position.
- This is done in the setup() function :
void setup() {
  // put your setup code here, to run once:
  gb.begin();

  motor.attach(10);    // Define of the control port of our servomotor as the D10 pin
  motor.write(10);     // Starting the motor at a 10° angle
}
Note that we start at 10° and not 0°. Our motor is a bit cranky when reaching absolute values of 0° and 180° so we will avoid those.
We can now control our servomotor at will.
Here we will give it a set of 3 fixed positions and have it switch between them depending on the push of our RIGHT, UP and LEFT buttons.
- We’ll also declare a string of characters “direction” that we will use to keep track of the position :
#include <Gamebuino-Meta.h>
#include <Servo.h> // Arduino library for servomotor control

Servo motor;      // declaration of a new servo called "motor"
char *direction;  // declaration of a string used to store position
Now let’s get to piloting.
- For this we add the following things into our loop() function :
void loop(){
  // put your main code here, to run repeatedly:
  gb.waitForUpdate();

// Change the motor position depending on the pressed button
  if (gb.buttons.pressed(BUTTON_RIGHT)){
    motor.write(10); // angle at 10°
    direction = "RIGHT";
  }
  if (gb.buttons.pressed(BUTTON_UP)){
    motor.write(90); // angle at 90°
    direction= "UP";
  }
  if (gb.buttons.pressed(BUTTON_LEFT)){
    motor.write(170); // angle at 170°
    direction = "LEFT";
  }
}
On every cycle we check whether a button was pressed and adjust the position, specified as an agnle value, according to it. We also change the “direction” string value depending on the pressed button.
By compiling and uploading the program to the console you can now control the servomotor by using the up, left and right buttons.
Step 3 : Adding visual interface
To better apprehend the movement of the servomotor we will add a small visual interface to our program. It’s a simple and quick way to have a feedback on our servo’s action without looking at it, very useful when it is used in a closed system such a small robot for instance.
to do this we will use a dedicated function called direction_display().
- We declare this function and add it to our loop() :
void loop(){
  // put your main code here, to run repeatedly:
  gb.waitForUpdate();

// Change the motor position depending on the pressed button
  if (gb.buttons.pressed(BUTTON_RIGHT)){
    motor.write(10); // angle at 10°
    direction = "RIGHT";
  }
  if (gb.buttons.pressed(BUTTON_UP)){
    motor.write(90); // angle at 90°
    direction = "UP";
  }
  if (gb.buttons.pressed(BUTTON_LEFT)){
    motor.write(170); // angle at 170°
    direction = "LEFT";
  }
  direction_display();
}

void direction_display() {
  gb.display.clear();
}
For now the function does nothing but clear the screen on every cycle, don’t worry we will fill it up in no time.
To begin with we will display the content of our “direction” string on screen. Displaying the content of a variable is one of the simplest and quickest way to check that a program runs correctly.
- We display the value by simply calling a printf() function into our direction_display() function :
void direction_display(){

  gb.display.clear();

  // Current direction display
  gb.display.setColor(WHITE);
  gb.display.printf( " %s", direction );
}

We now have a clear and precise indication of our servo’s direction on screen. We will do just a bit better by adding small icons in addition to the text, it’s easy and always bring the affordance of our program up.
For this we will use the drawTriangle function and fillTriangle function to create small “arrows” on the screen reprensting the direction of our servomotor.
- Hang on, it looks like thisi :
void direction_display(){

 gb.display.clear();

// Displaying directionnal arrows that change color depending on the current active position

if(direction == "UP"){
  gb.display.setColor(RED);
  gb.display.fillTriangle(gb.display.width()/2 - 5, 20, gb.display.width()/2, 10, gb.display.width()/2 + 5, 20);
}
else{
  gb.display.setColor(WHITE);
  gb.display.drawTriangle(gb.display.width()/2 - 5, 20, gb.display.width()/2, 10, gb.display.width()/2 + 5, 20);
}
if(direction == "RIGHT"){
  gb.display.setColor(RED);
  gb.display.fillTriangle(gb.display.width()/2 + 25, gb.display.height()/2, gb.display.width()/2 + 15, gb.display.height()/2 + 5, gb.display.width()/2 + 15, gb.display.height()/2 - 5);
}
else{
  gb.display.setColor(WHITE);
  gb.display.drawTriangle(gb.display.width()/2 + 25, gb.display.height()/2, gb.display.width()/2 + 15, gb.display.height()/2 + 5, gb.display.width()/2 + 15, gb.display.height()/2 - 5);
}
if(direction == "LEFT"){
  gb.display.setColor(RED);
  gb.display.fillTriangle(gb.display.width()/2 - 25, gb.display.height()/2, gb.display.width()/2 - 15, gb.display.height()/2 + 5, gb.display.width()/2 - 15, gb.display.height()/2 - 5);
}
else{
  gb.display.setColor(WHITE);
  gb.display.drawTriangle(gb.display.width()/2 - 25, gb.display.height()/2, gb.display.width()/2 - 15, gb.display.height()/2 + 5, gb.display.width()/2 - 15, gb.display.height()/2 - 5);
}

// Current direction display
gb.display.setColor(WHITE);
gb.display.printf( " %s", direction );
}
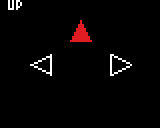
We just use a bunch of “if” and “else” to display empty white triangles in all 3 directions. The active direction, the one which we pressed the corresponding button last, gets its triangle replaced by a filled-up red triangle instead.
Note that the coordinates of the points of each triangles are mainly specified using the values of gb.display.height() and gb.display.width(). This allows for a program that will adapt to screen resolution even if it’s changed. In addition it’s much easier when placing objects at precise positions without having to calculate each point “by hand”.
Congrats ! You survived another of our tutorials ! I hope it helped you learn a few things. Now it’s your time to shine, fiddle with your program and make it do something else if you want, it’s a great way to learn.