another Python tutorial dedicated to the accessory pack.
This time we will look into the pir sensor. The program will be fairly simple, such as the one made in the C++ tutorial here
Getting started : Tools requirement
This tutorial is made with Mu IDE for CircuitPython.
If you haven’t installed those yet please refer to the installation guide on our website.
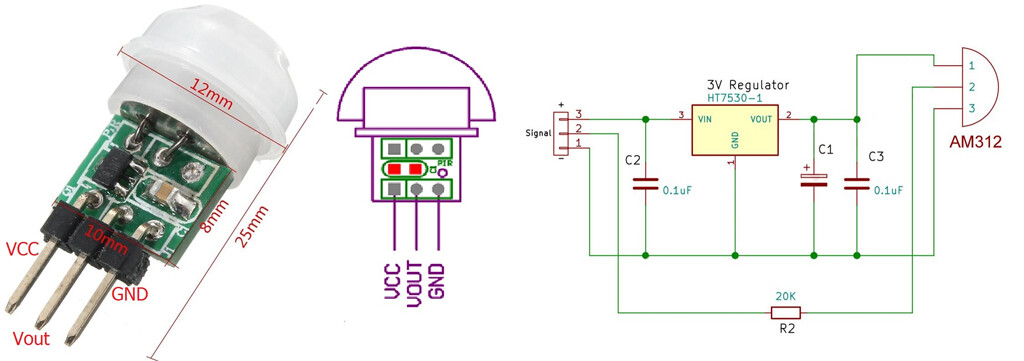
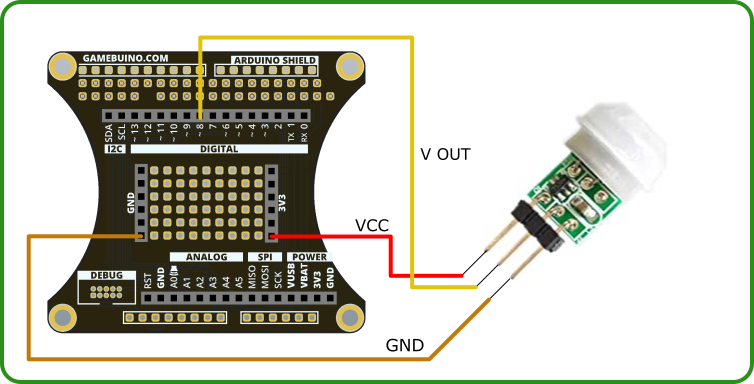
Wiring
Step 1 : Program’s basis
Start by opening Mu and creating a new file.
Copy the following code into this file :
from gamebuino_meta import begin, waitForUpdate, display, buttons, color
import board
import digitalio

while True:
    waitForUpdate()
    display.clear()
This will import the required Gamebuino libraries into the program, as well as a “digitalio” library needed to work with our sensor.
The part beginning by “while True:” is our main program loop, without it nothing would ever happen.
Step 2 : Reading from the sensor
We will first configure our sensor input into the console to read the signal it sends.
For this a couple lines of code will do :
pir_pin = digitalio.DigitalInOut(board.D8)
pir_pin.direction = digitalio.Direction.INPUT
We define the pin dedicated to the sensor as the D8 pin, then define this pin as an entry, from which we will be able to read data.
For this reading we will store the information into a variable called “old_value” such as :
old_value = pir_pin.value
This will allow us to have an initial reading at the start of the program that we will use as a reference point.
Once this reference is established the following steps are fairly simple and everything happens in the main loop.
We add a local variable “pir_value” in which we store the read value exactly like “old_value” :
while True:
    waitForUpdate()
    pir_value = pir_pin.value
The we just need to compare the two variables to determine whether our sensor picked up something or not.
This comparison is made in two parts :
while True:
    waitForUpdate()
    pir_value = pir_pin.value
    if (pir_value):
        if not (old_value):
            display.clear()
            display.print('Motion detected!')
    else:
        if (old_value):
            display.clear()
            display.print('No Motion')
    old_value = pir_value
In the first part we check if the sensor detects anything, if it does we check whether it was already detecting by checking if old_value if null, in which case we clear the screen before displaying the message “Motion detected !”
In the second part, having detected nothing we check if old value contains something, if it does it means we no longer detect movement, we then clear the screen before displaying the message “No Motion”.
At the end we replace the content of old_value by pir_value to establish continuity within our loop.
Congratulations ! You survived this (very short) Python tutorial.
Your program should look like this :
from gamebuino_meta import begin, waitForUpdate, display, buttons, color
import board
import digitalio

pir_pin = digitalio.DigitalInOut(board.D8)
pir_pin.direction = digitalio.Direction.INPUT

old_value = pir_pin.value

while True:
    waitForUpdate()
#    display.clear()
    pir_value = pir_pin.value
    if (pir_value):
        if not (old_value):
            display.clear()
            display.print('Motion detected!')
    else:
        if (old_value):
            display.clear()
            display.print('No Motion')
    old_value = pir_value
You can now upload it to your console using CircuitPython, don’t forget to save it locally on your computer to not lose it though.